Showing posts with label recipes. Show all posts

Monday, January 9, 2012

Baking tips

I'm an avid baker and over the years I've developed some strategies that help me keep the guesswork out of baking and increase my enjoyment of it. Not surprisingly, these strategies keep me organized as I bake, so I feel in control and get better results from my recipes!


Here are a few tips from my kitchen, and a recipe that I love.
  • I always get out all of the ingredients I will need at once before I start anything, that way I can see if I'm missing anything.
  • Then, as I finish using an ingredient, I put the rest of the item away. This might seem like an extra step, but it helps me see if there is anything left on the counter when I think I am done, so I can tell if I've accidentally left an ingredient out.
  • Using the correct temperature butter, eggs and other dairy products usually does affect the outcome of a recipe. I always try to plan ahead and pull those items out of the fridge early if they need to be warm, or leave them in fridge until the last minute if they need to be cold. If I forget, and need room temperature butter but have only just take it out of the fridge, then the microwave is a good alternative. Run eggs under water until they warm up a bit if you need room temp ones.
  • Really know your oven. Oven temperatures can vary widely, and I never take the recommended baking times in recipes at face value, but compensate in accordance with how I think my oven will behave.
Oatcakes
a recipe handed down from my mom


2 cups finely ground oatmeal (About 3 cups whole oatmeal. I use a food processor.)
1 cup unbleached white flour or whole wheat flour
3/4 cup unsalted butter, very soft or mostly melted
3/4 cup brown sugar
1/4 teaspoon baking soda
1 teaspoon kosher salt
1/4 cup boiling water

In a mixer or by hand mix butter and brown sugar until blended. Add dry ingredients and mix, adding the boiling water at the end to bind it all together. You should have a stiff dough. Shape dough into a log and slice into inch strips. Place strips two inches apart on a cookie sheet and bake for about 12 minutes at 400 degrees F until lightly browned. Let dry on a rack for a couple of hours. These should be crunchy on the on the outside, chewy inside. 

You really can't go wrong with this recipe - it doesn't matter what size the strips are...it always turns out!

Creative Commons photo of oatmeal posted to Flickr by S. Diddy

Call Lelah at 818.269.6671
or email lelah@lelahwithanh.com

Tuesday, November 22, 2011

A Thanksgiving Recipe

I'm so thankful for all my wonderful blog readers, so I'd like to share a family recipe with you, which I will be making for my family this Thanksgiving. These little morsels are huge crowd pleasers, so I usually double the recipe.

Happy Thanksgiving!


Swiss Cheese Tartlets

ingredients:
1 pre-made pie crust (in this recipe store-bought works better than homemade)
3 eggs
1/4 cup cream
1/8 teaspoon pepper
2 tablespoons very finely minced onion
1/4 lb. grated Swiss cheese
1/4 teaspoon poppy seeds (or up to 1 teaspoon as desired)

instructions:
Roll crust thin and cut out rounds about 2’’ in diameter. Press into greased or nonstick shallow muffin tins. (You can use a regular muffin tin as well, just press the crust in gently so it will be easy to remove later.) Beat eggs and mix in rest of ingredients. Pour 2 teaspoons of egg mixture into each crust shell. Chill for 30 minutes in the refrigerator. Preheat oven to 425 F. Bake at 425 for five minutes, then turn down oven to 350F and continue baking for 12 minutes or so until lightly browned on top and on edges and center is puffed up a bit. Best served warm. You can freeze and reheat in the microwave or oven, but they won't be quite as good as fresh.

Get help for the holidays from a professional organizer.
Call Lelah at 818.269.6671
or email lelah@lelahwithanh.com

Tuesday, June 28, 2011

Having versus using

I had a Bon Appetit subscription for a year in 2007. I enjoyed reading the magazine, but never seemed to actually make any of the recipes. I collected each issue and put them in a cute magazine holder from Ikea. And there they sat, alongside my cookbooks and Cooks Illustrateds (which I use regularly). I think something about the glossy pages and not being able to quickly find a recipe that had any resemblance to something I had in mind to make prevented me from every consulting them.


A few weeks ago I realized that these magazines were not doing me any good sitting prettily in a box. I decided to take them apart, the way I do with my Real Simple every month after reading it. It took a few days, stealing snatches of time before bed or while watching 30 Rock on Netflix Instant, but I went through each one and cut out (well, tore out) any recipe that looked like I might actually make one day. I then filed each one in my recipe binders, which I video blogged about here.

Since then, I've made two recipes from those magazines and they both came out amazingly. I know it's easy to find a recipe for almost anything you want online, and I do that often, but making a recipe that I saved out of a magazine is somehow more of an adventure for me. Now I have more room on my bookshelf and it gives me pleasure to know I'm using the Bon Appetits instead of just having them.

Lelah Baker-Rabe is a Los Angeles-based professional organizer. To discuss your organizing needs, call her at 818.269.6671 or email lelah@lelahwithanh.com. Sign up for Lelah's News, a once-monthly newsletter.


Tuesday, November 16, 2010

Organizer's Blog Digest: Thanksgiving 2010

Here are some excellent posts from around the web that might help you as you plan and execute this year's Thanksgiving day.

Lelah's 2009 Thanksgiving dinner plate before.

Lelah's 2009 Thanksgiving dinner plate after.

Real Simple magazine had a great recipe section devoted to Thanksgiving recipes in November's issue. Here is their comprehensive timeline/checklist for planning for the holiday.

The New York Times has a beautiful spread of vegetarian and vegan dishes that would be fantastic additions to any Thanksgiving table.

Lauri Ward, of Use What You Have decorating, posted about the benefits of cleaning out your kitchen clutter before Thanksgiving dinner. Her point that "if you haven’t put the stuff to use in half a decade do you think you’re going to start on November 25th?" is well taken. I say, don't stop there. If you decided to keep it because you thought you might use it for holiday prep or presentation, and you didn't, then let it go without a second thought.

Last year's blog digest on this same topic is evergreen. Here it is for more links.

Happy Thanksgiving!

Lelah Baker-Rabe is a Los Angeles-based professional organizer. To discuss your organizing needs, call her at 818.269.6671 or email lelah@lelahwithanh.com

Wednesday, July 21, 2010

Video: Recipe binders

Recently I changed the way I organize my loose recipes from a file folder system to three-ring binders. Binders are great for lots of organizing projects, and the following video shows how I put together ones to contain all my loose recipes.

You may also be interested in my three part series on how to organize recipes: cookbooks, individual loose recipes and digital recipes.


Lelah Baker-Rabe is a Los Angeles-based professional organizer. To discuss your organizing needs, call her at 818.269.6671 or email lelah@lelahwithanh.com

Monday, June 7, 2010

A year ago: preparing for every day, storing recipes and keeping it together

Here's a recap of what I think are my best posts from around this time last year:

An exhortation to follow one of the primary rules of organizing: keep like items together.

My three-part series on how to organize recipes, from cookbooks to individual loose recipes to digital ones. I still think these are the best ways to go about managing what for my cooks is a losing battle with new recipes coming in all the time. My loose recipes have over time moved from file folders to clear sleeves in a binder, but both work.

Lastly, in the first installment of my preparing for everyday series, I write about what every prepared person should have in their desk drawer.

Creative Commons photo posted to Flickr by cleverclevergirl
Lelah Baker-Rabe is a Los Angeles-based professional organizer. To discuss your organizing needs, call her at 818.269.6671 or email lelah@lelahwithanh.com

Monday, November 23, 2009

Tips and Tools: Recipe annotation

The handwritten recipe book that my mom kept and used when I was a kid held a wealth of information in its pages. Almost every page was also decorated with the remnants of egg white, coffee stains, dustings of flour and smears of peanut butter and Crisco. It's impossible to not get a little bit of your ingredients on your cookbooks, and it's one of the things that makes them living documents. Another thing that makes cookbooks and recipes much more valuable than the paper they are printed on is the knowledge one learns every time one makes a recipe. What substitutions were made, how the end results looked and tasted, and the exhortation to use less salt next time are all pieces of information that should be written down when you make a recipe so that they next person who makes it has insight beyond what's printed on the page. Taking good notes on recipes saves time and headaches the next time you want to make the recipe, and it will help you decide what to make or what not to make. Of course, many of the things home cooks make aren't found in recipe books at all, but come out of our own heads, and it's a good idea to try to write those down as well, as you are making it, as trying to remember after the fact is nearly impossible, even if you've made it a hundred times.

Some things you can annotate your recipes with:

  • Date you made the recipe
  • Occasion for which you made it
  • End result: good, bad, ugly?
  • Your recommendation whether or not to make it again
  • Any substitutions made or ingredients omitted
  • Changes to the method that you made or want to try next time

If you feel uncomfortable writing on the actual pages, you can use a Post-it for your notes and affix it to the page. I use a pencil and use page flags to mark recipes that I have made and that I want to try. Also, check out my how to organize recipes series: Part 1, Part 2 and Part 3.

Lelah Baker-Rabe is a Los Angeles-based professional organizer. To discuss your organizing needs, call her at 818.269.6671 or email lelah@lelahwithanh.com 

Wednesday, June 3, 2009

How to organize recipes: part three

Now that our cookbooks and paper recipes are neatly organized, we turn to...

Electronic Recipes

Recipes can be saved on the computer in a variety of ways. They can exist as a document file or pdf, in the form of recipe database software, or as a bookmark that takes you to a favorite recipe posted on a website like epicurious.com or foodnetwork.com. Though these types of recipes are not exactly cluttering your space, a given recipe can be even more difficult to find on the computer than among paper recipes shoved in a drawer. 

Retrievability is the most important thing for electronic information. Here are the main things to keep in mind:

  • Database-style recipe programs will have their own search feature built in, and you shouldn’t have a problem finding a recipe that way. 
  • File-based recipes saved as documents should be labeled appropriately and stored in a recipe folder. How you label and nest your files and folders is up to you, but try to have them mirror your hard copy categories (discussed in the Loose Recipes post) as much as possible.
  • The document file itself should be titled the way you would look for the recipe, with as many pertinent keywords as you can fit. You should be able to visually scan your recipe folder and find the file you are looking for. For instance, a particular potato salad recipe might be called Potato Salad Mom's Low-Fat Recipe to tell you exactly which potato salad recipe it is.
  • If you save one long document with all of your recipes one right after another, you can use the search feature of your word processing program (command- or control-f) to find the recipe you are looking for. (I find this method gets unwieldy and don't use it).
  • You can also use the computer’s file search capabilities to find the file you are looking for if you search using the same keywords that are in the document or file name.
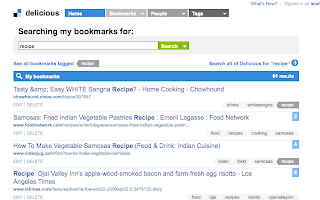
  • Online bookmarks can be done a variety of ways as well. I like the free social bookmarking application delicious for my recipe bookmarks, because it is easily searchable by keyword and it can be accessed from anywhere. I use delicious to save my recipes and tag them with basic keywords so I can see them all in one place if I want: “recipes, food, cooking.” Then I add others as necessary to help me find a specific recipe again, such as “lemon, madeleines, baking, cookies, tea cookies” for a madeleine recipe. 
  • I don’t bother with the “favorites” feature that many cooking websites have, where you can sign up for an account and keep track of favorites recipes through it. Retrieving a recipe would then require you go to that website, sign in, and access your favorites, rather than simple typing in a keyword to your delicious account and clicking on the link when it comes up. The only time an account would be really useful is if you are on a particular site a lot, and want to interact socially with the other users by leaving comments, etc.
  • Once you have found the recipe you are looking for on your computer or in your bookmarks, you can print it and take it to the kitchen, bring your laptop with you if you are brave enough to have ingredients near your keyboard, or you can call the recipe up on a handheld electronic device. I have an iPod Touch, so I can email myself the link to a recipe and call it up on the device once I'm in the kitchen. There are also recipe-related iPhone/iPod Touch applications that can be downloaded for free, such as epicurious.com's mobile app.
Now we've covered the basics of recipe organization, give your recipe collection some attention and let me know what works, and what doesn't, for you!

Screenshots from epicurious.com and delicious.com. 

Lelah Baker-Rabe is a Los Angeles-based professional organizer. To discuss your organization needs, call her at 818.269.6671 or email lelah@lelahwithanh.com 

Tuesday, June 2, 2009

How to organize recipes: part two

After going over ideas for organizing cookbooks, we're moving on to...

Loose Recipes

I have recipes from magazines, newspapers, emails, newsletters and food packages. I have hand written recipes from relatives, photocopied recipes with handwritten annotations from relatives and homemade cookbooks from relatives. Recipes come to us in all shapes and sizes, and putting them in some kind of order can be daunting.

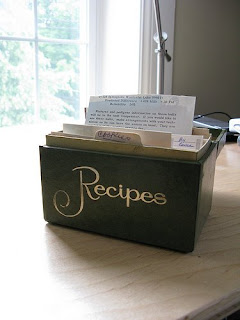
The little index-card sized recipe boxes are pretty to look at, but require rewriting recipes to fit on the appropriate cards. Definitely too much work. Even if you had a container that held all of these recipes perfectly, then the question is, how to you file them? By ingredient (meat, rice, vegetables, fish)? By course (breakfast, appetizer, dessert)? In this day and age, you could even organize them by chef (Jamie Oliver, Paula Deen), by origin (Martha Stewart Living, Gourmet, The New York Times Magazine), or by audience (vegetarian, vegan, raw). Not to mention family-passed-down recipes. Plus, there’s another designation: those tried and true favorites that you practically know by heart, the ones you tried before and worked, but aren’t in the regular rotation, and the recipes you want to try one day, when you get around to buying coriander seeds.

I’m beginning to think an entire book could be written on organizing recipes! Let’s just say that the ultimate way you organize your recipes is up to you. The important thing is that you create a system through which you can actually find the recipe you are looking for when you need it. Here are some suggestions:

  • Toss any recipe that you tried and hated, or will never try. (Less to organize later.)
  • Decide how you want to organize your recipes and sort them accordingly. I have mine sorted by broad categories (Meat, Vegan, Dessert, Soups), and then have a couple of sub categories (Cookies, Duck). Of course, many recipes will belong to more than one category, but don’t agonize over it. Just put it in the category where you think you’d most likely look for it in a month or two.
  • Assess your space and decide on a container. Do you have cookbooks and loose recipes and want to keep them together? In that case, my suggestion is getting a binder or magazine holder that can be filled with clear plastic sleeves and maybe even dividers with labels to hold your recipes. Then the entire thing can be shelved like a book. Do you not have room for the loose recipes on your bookshelf and want something decorative in the kitchen? In that case, you might want to try a recipe box.
  • Once the recipes are filed away (with room add more in the future), test the system by looking for a few recipes and seeing if you can find them easily. Have a family member try as well. It would be handy if your kids could find the macaroni and cheese recipe in the pasta section of your recipe binder as easily as you can!

Click here for one more post on organizing electronic recipes!


Lelah Baker-Rabe is a Los Angeles-based professional organizer. To discuss your organizational needs, call her at 818.269.6671 or email lelah@lelahwithanh.com
Visit her website at http://www.lelahwithanh.com/

6/11/09 update: I found out about a product called Recipe Nest via the Need Another You organizing blog. This is a binder-like product that apparently makes it easy to store paper-based recipes. I like the bright colors it comes in, and the fact that it is pretty spill-proof and can be stored on a shelf with your books. The site for the company that makes it, Recipe Relish, has more info, but it is made with Flash so I can't deep link to the most useful information. I haven't used this product myself, but it might be work checking out.

Monday, June 1, 2009

How to organize recipes: part one

Recipe organization is one of those areas where there as many solutions as people. I’ve yet to meet someone who organized her recipes exactly like anyone else. I think the main issue is that recipes come in many forms, whether bound in cookbooks, loose in an infinite number of shapes and sizes, or stored somewhere on your computer. If you don’t have any system at all, except maybe a drawer stuffed to the gills with paper, or a bookshelf loaded with dog-eared cookbooks, here are some suggestions to get things onto organized footing. Since this is a pretty in-depth topic, I’ve decided to create three separate posts for the three main recipe formats: cookbooks, loose recipes and electronic ones.

Cookbooks

  • First of all, donate or sell any cookbook that you never make recipes from.
  • Second, organize what's left however you tend to set up your books (by author, binding type, etc). I like to organize my cookbooks by subject, from general to specific. That means I have The Joy of Cooking and The Bon Appetit Cookbook on one end and Citrus Cookbook and Pancakes: From Morning to Midnight on the other.
  • Thirdly, if there is a big book taking up a lot of space and you only use a couple of the recipes in it, remove, scan or photocopy those recipes and get rid of the book. It’s just taking up space.
  • Fourth, the remaining books need to have a system for finding frequently used or "want to try" recipes. This system could be as simple as a Post It note, page marker/flag or book mark on which you write a note that can be seen from the outside of the book to remind you what’s on that page. The note you write yourself shouldn’t necessarily match the title of the recipe; make it the name you remember the recipe by (e.g.: Spicy Ribs instead of Roasted Asian-Spiced Pork Ribs).
Cookbook Tips

  • Tip: If you’re an exuberant cook and don’t want to have to worry about getting ingredients all over your cookbook pages, photocopy a working copy of a recipe and leave the book safely shelved while you are working.
  • Extra tip: If you have a cookbook collection, you may not want to put anything with adhesive to mark your recipes, since the adhesive can damage the book over time. Use slips of paper instead.
  • Super extra recipe tip: Whenever I make a recipe, I mark the date I made it and any notes to myself in pencil on the recipe. It helps when I’m looking for a chocolate sauce recipe if the one I find in the Bon Appetite cookbook has a note reminding me I tried it two years ago and it didn’t turn out very well. 
Tune in later this week for parts two and three of how to organize recipes!

Creative Commons cookbook photo posted to flickr by LollyKnit